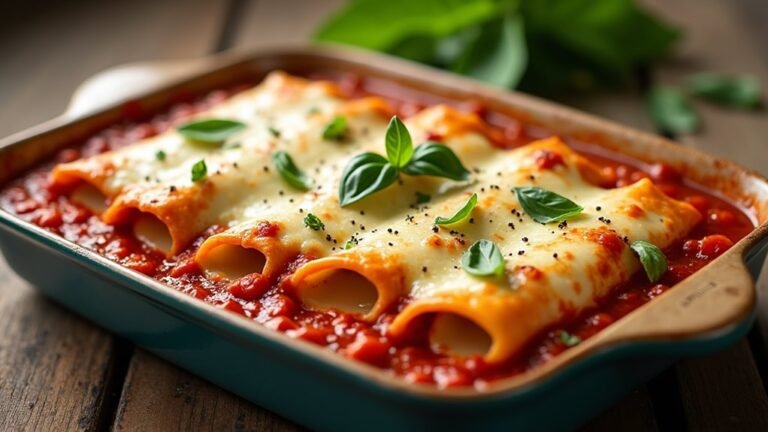
Beef Enchiladas Recipe: Bold and Cheesy
Nearly 70% of Americans regularly enjoy Mexican food. If you want to bring those flavors home, try a bold and cheesy beef enchiladas recipe.
With a savory mix of ground beef and cheddar cheese, these enchiladas offer a delightful taste. The process is straightforward, from browning the beef to rolling the tortillas.
The rich, zesty topping truly sets this dish apart. You'll be eager to see how it all comes together for your next meal.
Key Takeaways
- Use 1 pound ground beef, 10 corn tortillas, and 2 cups cheddar cheese for the core ingredients.
- Enhance the flavor with a 15 oz can of enchilada sauce and a 4 oz can of diced green chilies.
- Brown the ground beef and warm the tortillas until pliable before filling and rolling.
- Pour enchilada sauce over assembled tortillas in a baking dish for added depth.
- Store leftovers in an airtight container and reheat in an oven to maintain texture.
Recipe
Bold and Cheesy Beef Enchiladas are a delightful way to bring the flavors of Mexican cuisine to your home. This recipe simplifies the traditional process by using just five key ingredients, ensuring you can enjoy a delicious meal with minimal fuss. The blend of seasoned ground beef, melted cheddar cheese, and soft corn tortillas creates a satisfying mix of textures and flavors, all tied together with a rich enchilada sauce. With just a little preparation, you can have a comforting, crowd-pleasing dish ready to serve.
The heart of this recipe lies in its simplicity and the harmony of its ingredients. Ground beef is browned to perfection, providing a savory base that complements the creamy melted cheese. Corn tortillas, once warmed, become pliable and easy to work with, allowing you to create neat rolls that hold the flavorful filling. The enchilada sauce adds depth and complexity, while the green chilies give a hint of spice that enhances rather than overwhelms.
Ingredients:
- 1 pound ground beef
- 10 corn tortillas
- 2 cups shredded cheddar cheese
- 1 can (15 oz) enchilada sauce
- 1 can (4 oz) diced green chilies
Begin by browning the ground beef in a large skillet over medium heat, ensuring any excess fat is drained off. Warm the corn tortillas until they become soft and pliable. Fill each tortilla with the browned beef and some of the shredded cheese, then roll them up tightly. Place the rolled tortillas seam-side down in a baking dish.
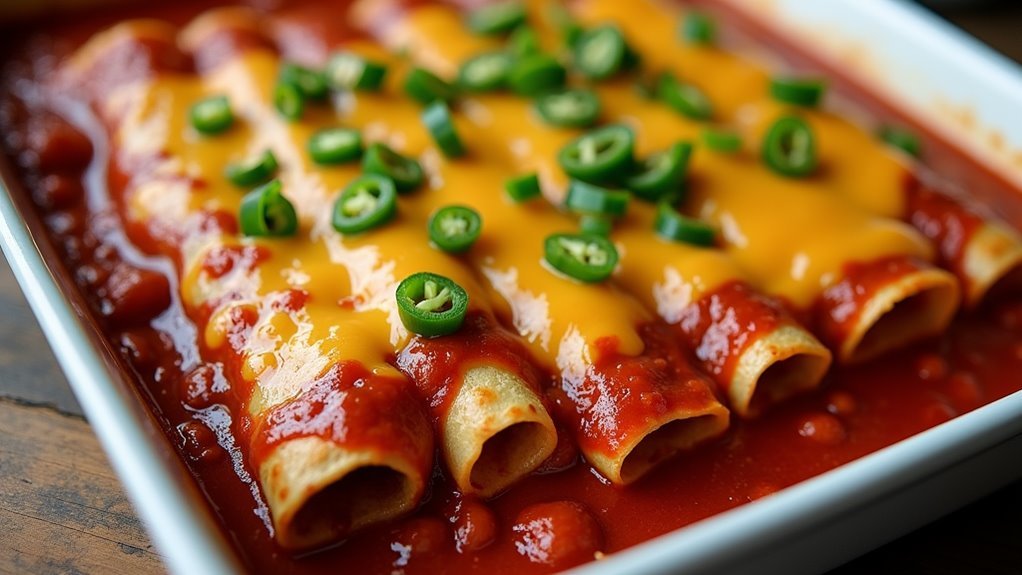
Pour the enchilada sauce evenly over the tortillas, then sprinkle the remaining cheese and diced green chilies on top. Bake in a preheated oven at 375°F for 20-25 minutes, or until the cheese is melted and bubbly.
For best results, avoid overstuffing the tortillas to prevent cracking. Warming the tortillas before filling makes them more flexible and less likely to tear. If you have leftovers, store them in an airtight container in the refrigerator for up to three days.
When reheating, use an oven instead of a microwave to maintain the dish's texture, as microwave reheating can make the tortillas soggy.
Cooking Steps
Get ready to create a delicious batch of beef enchiladas by starting with browning the ground beef in a skillet, letting the aroma fill your kitchen as it cooks to perfection.
Warm the tortillas until they're soft and pliable, making them easy to fill with the savory beef mixture and a generous sprinkle of cheese.
Roll them up snugly, place them seam-side down in a baking dish, and pour the rich enchilada sauce over the top before baking to bubbly, cheesy goodness.
Step 1. Brown the Ground Beef
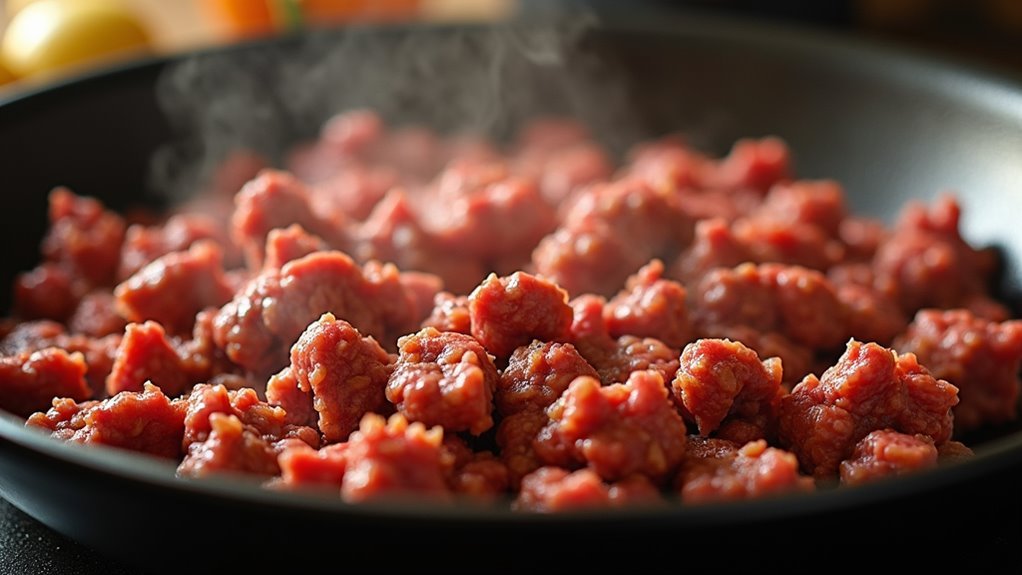
To start, place a large skillet over medium heat and add the ground beef. As the beef sizzles, use a wooden spoon or spatula to break it into smaller pieces, ensuring even cooking.
You'll want to stir it occasionally, so every bit gets a lovely brown color. The aroma that fills your kitchen will be irresistible! Keep cooking until the beef is browned, which takes about 7 to 10 minutes.
Once browned, it's important to drain any excess fat. This step ensures your enchiladas aren't greasy, allowing the flavors to shine.
Draining the fat also makes the dish healthier. Feel the satisfaction as the beef transforms, ready to become part of your mouthwatering enchiladas. You're well on your way to a delicious meal!
Step 2. Warm Tortillas Until Pliable
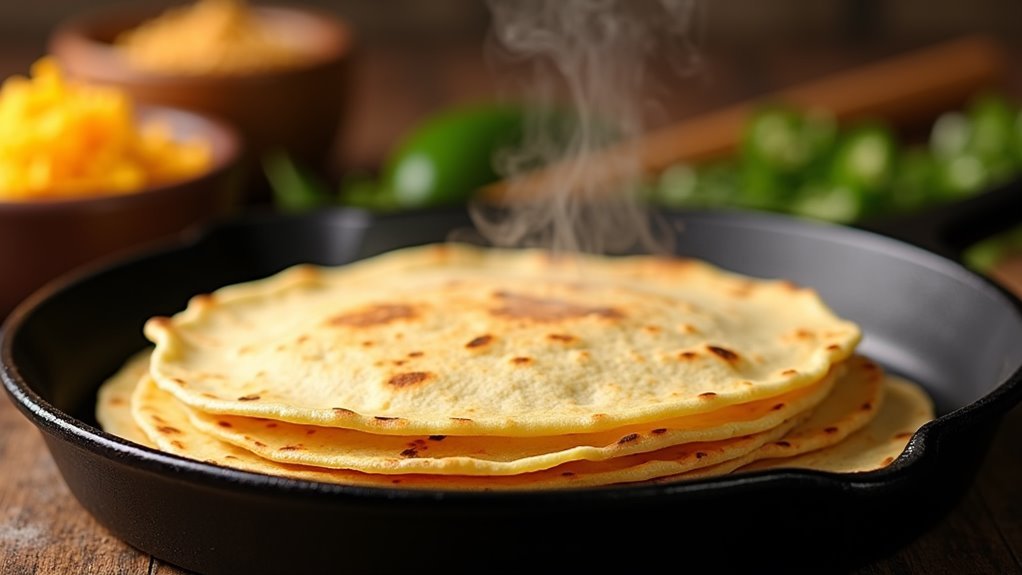
Before you start assembling your enchiladas, ensure your corn tortillas are warm and pliable. This crucial step transforms your enchiladas from ordinary to extraordinary, allowing you to roll them easily without cracking.
To achieve this, you can use a skillet, microwave, or oven. If using a skillet, heat each tortilla for about 15-20 seconds per side until soft. For the microwave, wrap them in a damp paper towel and heat for around 30 seconds. An oven works too; wrap them in foil and warm them at 350°F for about 10 minutes.
The warmth makes them flexible, enhancing the overall texture of your dish. Embrace this step, and you'll find your enchiladas bursting with flavor and satisfaction!
Step 3. Fill Tortillas With Beef Mixture
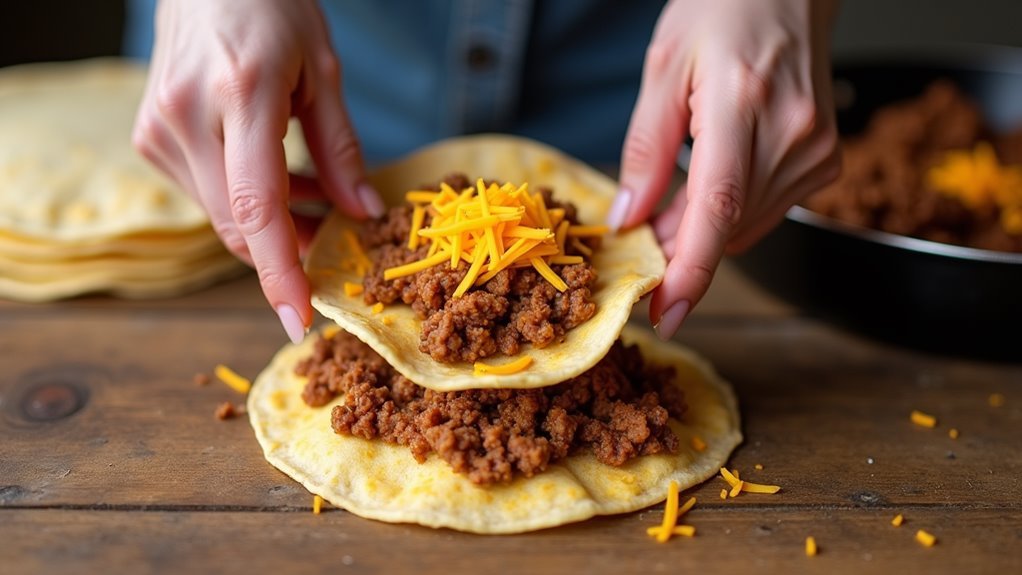
Once your tortillas are warm and pliable, it's time to fill them with the delicious beef mixture.
Grab a spoon and scoop a generous amount of the seasoned ground beef onto each tortilla, letting the rich aromas entice your senses.
Sprinkle a handful of shredded cheddar cheese over the beef, ensuring every bite will be cheesy and satisfying.
If you like a bit of heat, add some diced green chilies to the mix, bringing a spicy kick to the ensemble.
Be careful not to overstuff the tortillas, as you want them to stay intact and easy to handle.
Filling each tortilla is an exciting part of this process, as you can already imagine the mouthwatering flavors coming together.
Step 4. Roll Tortillas, Seam-Side Down
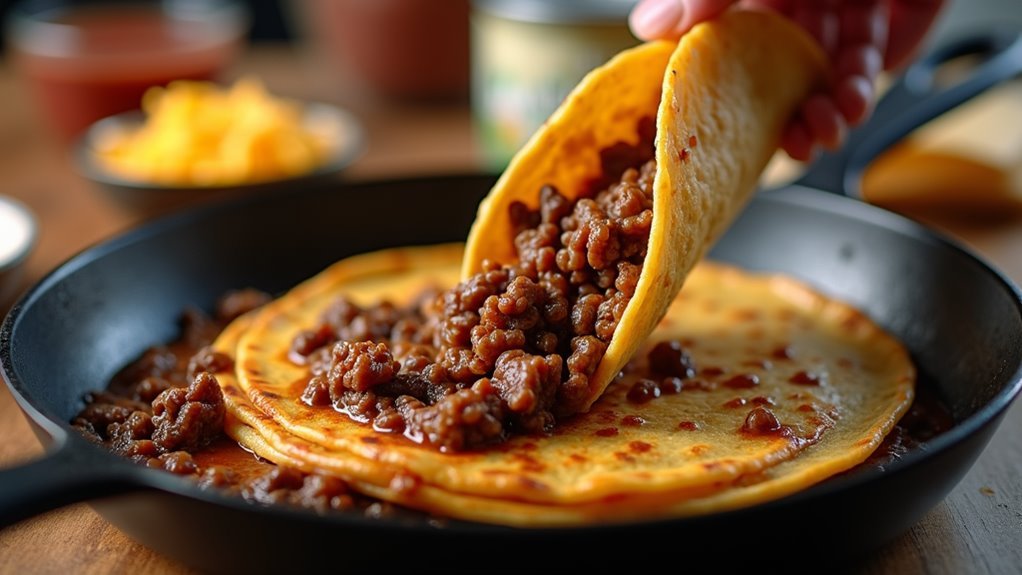
With your filled tortillas ready, the next step is to roll them up tightly.
Lay each tortilla flat, then fold the sides over the delicious beef and cheese filling. Roll from one end to the other, ensuring everything stays snug inside. This ensures each bite bursts with flavor!
Once rolled, place each tortilla seam-side down in your baking dish. This helps them stay closed while baking, ensuring the cheese and beef don't spill out.
By keeping the seam-side down, you allow the enchiladas to retain their shape and maximize their ooey-gooey goodness. It's a simple step, but it makes all the difference in achieving that perfect enchilada experience.
You're one step closer to savoring these bold and cheesy delights!
Step 5. Pour Sauce Over Tortillas
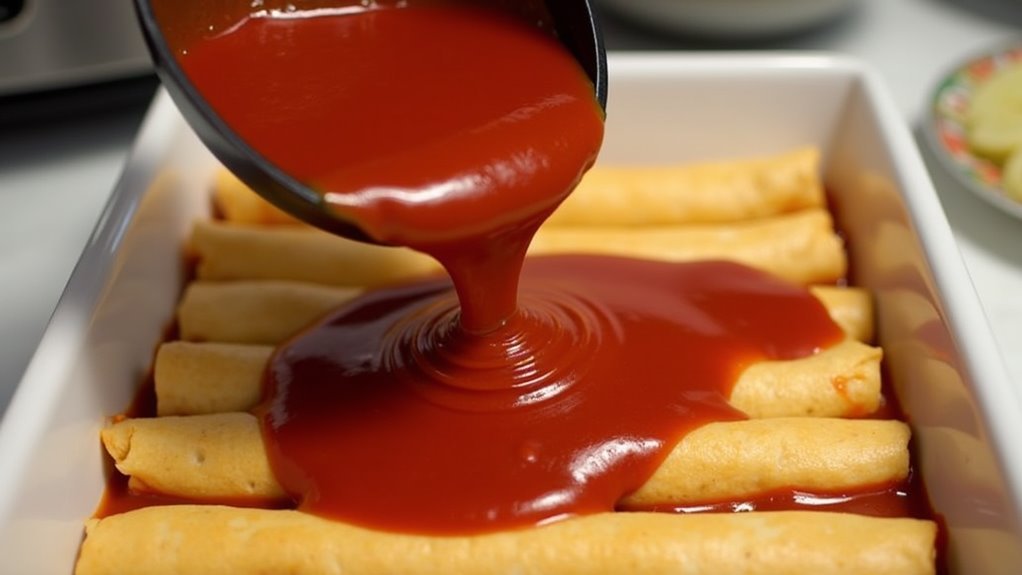
You've got your enchiladas rolled and snug in the baking dish, ready for the next flavorful layer.
Now, it's time to drench them in that rich, savory enchilada sauce. Grab your can of sauce and pour it generously over each tortilla, making sure every inch is coated. The sauce is where the magic happens, soaking into the tortillas and marrying the flavors of beef and cheese.
Don't hold back—more sauce means more deliciousness! As you pour, picture how the sauce will bubble and mix with the cheese as it bakes. This step is essential for achieving that mouthwatering, authentic taste.
Once the sauce is evenly distributed, you're ready to sprinkle on the remaining cheese and green chilies.
Final Thoughts
Savoring a plate of Bold and Cheesy Beef Enchiladas is a delightful experience that brings comfort and satisfaction to any meal. This recipe is perfect for both novice and seasoned cooks, offering an easy yet flavorful journey into Mexican cuisine.
You'll appreciate how the rich, savory beef pairs with creamy, melted cheese, all enveloped in soft corn tortillas. The enchilada sauce adds a burst of flavor, making each bite truly memorable.
Don't hesitate to experiment by adding your favorite toppings like fresh cilantro or a dollop of sour cream. Cooking is all about making it your own.
Embrace the fun of creating a dish that's both delicious and heartwarming. Try this recipe, share it with loved ones, and enjoy the joy it brings.
Frequently Asked Questions
Can I Use Flour Tortillas Instead of Corn Tortillas?
Absolutely, you can use flour tortillas instead of corn tortillas!
They'll give you a softer, chewier texture that many people love. Just make sure to warm them slightly before filling to prevent tearing.
This substitution can add a delightful twist to your enchiladas, making them unique and delicious.
Don't hesitate to experiment and find what suits your taste best.
Enjoy crafting your own version of this classic dish with enthusiasm!
What's the Best Way to Store Leftover Enchiladas?
You've just enjoyed a delicious meal, but what about those leftovers?
Here's the trick: store them in an airtight container, ensuring every last bit of flavor stays locked in.
Pop them in the fridge, and they'll be good for up to three days.
When you're ready for round two, skip the microwave. Instead, reheat them in the oven to keep that satisfying texture, letting the cheese melt again to perfection.
Enjoy every bite!
Can I Substitute Ground Beef With Another Protein?
Absolutely, you can swap ground beef with other proteins like chicken, turkey, or even beans for a vegetarian twist!
Just cook the meat or beans thoroughly, season them well, and follow the same steps.
This flexibility lets you tailor the dish to your taste or dietary needs.
Experimenting with different proteins can offer new flavors and textures, making your enchiladas exciting and unique every time you make them.
Enjoy the creativity!
How Can I Make the Dish Spicier?
To turn up the heat, add sliced jalapeños or a dash of cayenne pepper to your dish.
Imagine the warmth spreading through each bite!
You can also mix in spicy chili powder with the beef, or use a hotter enchilada sauce.
Roasted poblano peppers bring a smoky kick, too.
Layer these in with the cheese and beef for extra zing.
Are There Any Vegetarian Alternatives for This Recipe?
You can totally make this recipe vegetarian! Swap the beef for black beans or sautéed mushrooms to get a hearty texture.
Add some grilled veggies like bell peppers and zucchini for extra flavor. Use the same enchilada sauce and cheese—it's all about keeping that bold, cheesy goodness.
You'll love how the flavors blend together, making every bite exciting! Don't forget to warm those tortillas to keep them flexible and easy to roll.
[DIRECTIONS]: