Quick Chicken Fingers Recipe: A Kid-Friendly Favorite

Picture the sizzle of chicken fingers as flavors come alive in your kitchen. This simple recipe uses chicken tenderloins, breadcrumbs, and pantry staples to create a kid-approved meal that's both crispy and juicy. Perfect for hectic weeknights when time is short but expectations are high. Curious about achieving that perfect golden crunch? Let's explore how to easily bring this kid-friendly favorite to life.
Key Takeaways
- Chicken fingers are a popular choice for children due to their crispy texture and tender interior.
- The recipe requires only five ingredients, making it quick and simple to prepare.
- Seasoned breadcrumbs add flavor, while eggs ensure a crispy coating.
- Fry chicken fingers for 4-5 minutes on each side until golden brown.
- Serve with various dipping sauces for added fun and taste.
Recipe
Chicken fingers are a timeless favorite, perfect for a quick meal that satisfies both kids and adults. With a crispy, golden crust and a tender interior, these chicken fingers are sure to become a staple in your household. This simple recipe uses just five ingredients, making it easy to whip up in no time. The key is in the seasoned breadcrumbs and ensuring the chicken remains juicy during cooking, resulting in delicious chicken fingers that everyone will love.
To start, you'll need chicken breast tenderloins, plain breadcrumbs, eggs, salt, and black pepper. The process involves coating the chicken in a seasoned breadcrumb mixture before frying them to golden perfection. This easy recipe is ideal for busy weeknights when you want to serve a tasty meal without too much hassle.
Ingredients:
- 2 pounds chicken breast tenderloins
- 2 cups plain breadcrumbs
- 2 large eggs
- 1 teaspoon salt
- 1/2 teaspoon black pepper
To prepare the chicken fingers, first cut the chicken tenderloins into even strips if necessary. Beat the eggs in a shallow bowl. In a separate bowl, mix together the breadcrumbs, salt, and black pepper. Dip each chicken piece into the beaten egg, then coat it thoroughly with the seasoned breadcrumbs.
Heat oil in a large skillet over medium heat. Cook the chicken fingers for 4-5 minutes on each side until they're golden brown and cooked through. It's important to work in batches to avoid overcrowding the pan, which ensures even cooking and crispy results.
For best results, maintain the oil temperature at around 350°F (175°C) throughout cooking to prevent the exterior from burning before the chicken is fully cooked. Be sure to pat the chicken dry with paper towels before breading to help the coating adhere better.
To check for doneness, cut into the thickest part of a chicken finger; the meat should be white with no pink areas. Once cooked, let the chicken fingers rest on paper towels for 2-3 minutes before serving to keep them crispy.
Cooking Steps
Let's get cooking and transform those chicken tenderloins into delicious, crispy chicken fingers!
Start by slicing the chicken into even strips.
Then beat the eggs in a bowl to create a sticky base for the breadcrumbs.
Mix the breadcrumbs with salt and pepper, coat each strip thoroughly, and fry them until they're beautifully golden and irresistible.
Step 1. Slice Chicken Into Strips
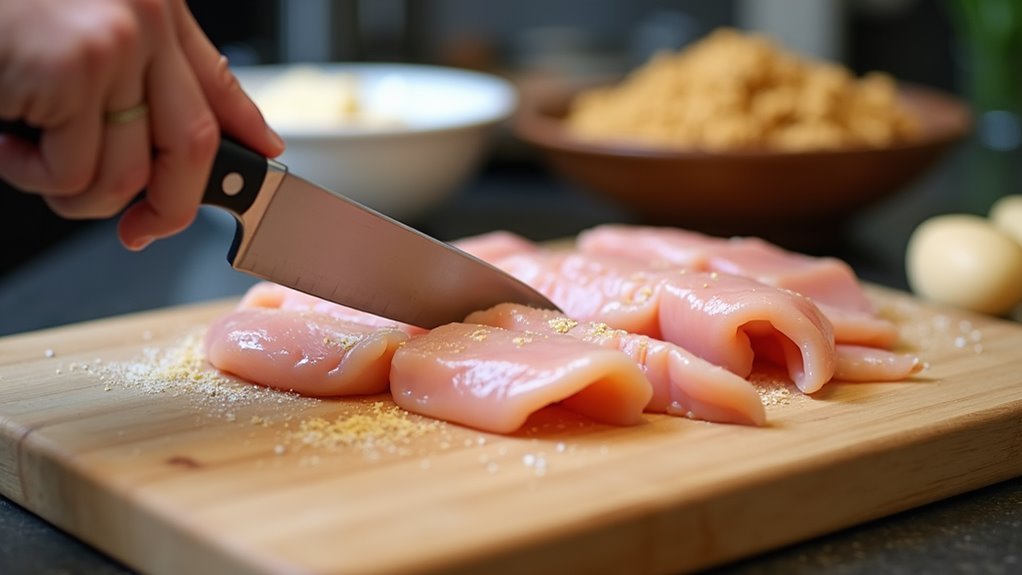
Wondering how to get those perfectly sized chicken strips? Start by laying your chicken breast tenderloins flat on a cutting board.
Grab a sharp knife, and with steady hands, slice each tenderloin lengthwise into evenly sized strips. Aim for about half-inch widths to ensure they cook evenly and quickly.
Feel the joy of transforming raw chicken into cook-ready strips! Keeping the sizes consistent helps the strips cook at the same rate, so you'll have evenly crispy and juicy chicken fingers every time.
Don't rush this step; savor the process, knowing you're crafting a delicious meal. Remember, the goal is to make each piece bite-sized, perfect for little hands and appetites.
With your chicken ready, you're one step closer to a kid-friendly favorite!
Step 2. Beat Eggs in Bowl
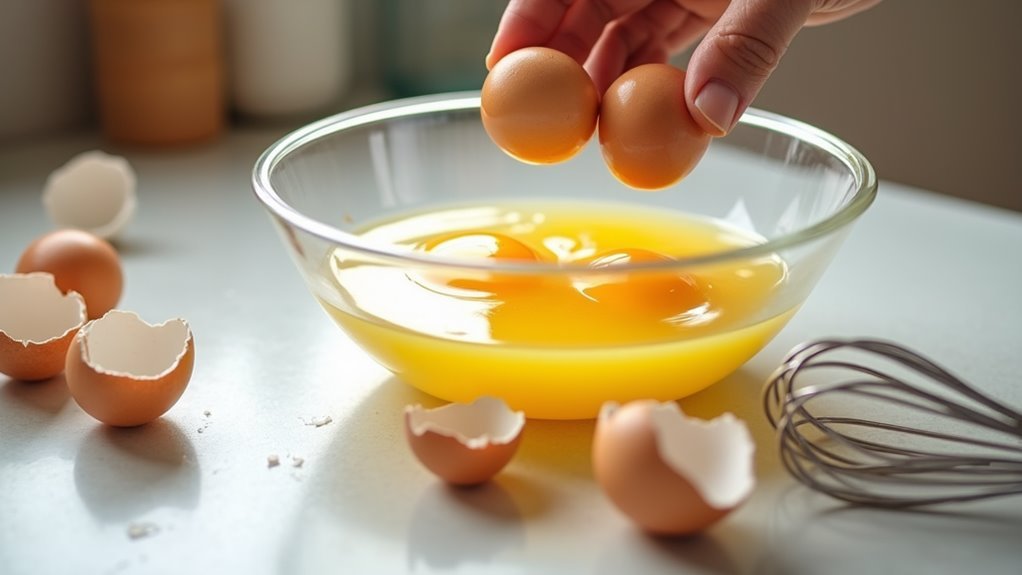
Once you have your perfectly sized chicken strips ready, it's time to prepare the egg wash, which is an important step in ensuring the breadcrumbs adhere properly.
Grab two large eggs and crack them into a shallow bowl. This is where the magic begins! Use a fork or a small whisk to beat the eggs until the yolks and whites are fully combined.
You want a smooth, uniform mixture to coat each piece of chicken. This step is crucial because it acts as the "glue" that holds the crispy coating together.
Imagine the satisfying crunch you'll get with every bite! As you beat the eggs, you're setting the stage for a delicious, kid-friendly meal that's sure to become a family favorite.
Step 3. Mix Breadcrumbs With Seasonings

Now that your egg wash is ready, it's time to create the flavorful coating for your chicken fingers.
Grab a bowl and pour in two cups of plain breadcrumbs. To bring out the best taste, sprinkle in one teaspoon of salt and half a teaspoon of black pepper.
Mixing these seasonings into the breadcrumbs not only adds flavor but also ensures each bite is perfectly seasoned. Stir it all together with a fork, making sure the salt and pepper are evenly distributed.
This seasoned breadcrumb mixture will give your chicken fingers that irresistible crispy, golden crust everyone loves. By taking the time to mix these ingredients well, you're setting the stage for a delicious, kid-friendly meal.
Step 4. Coat Chicken With Breadcrumbs
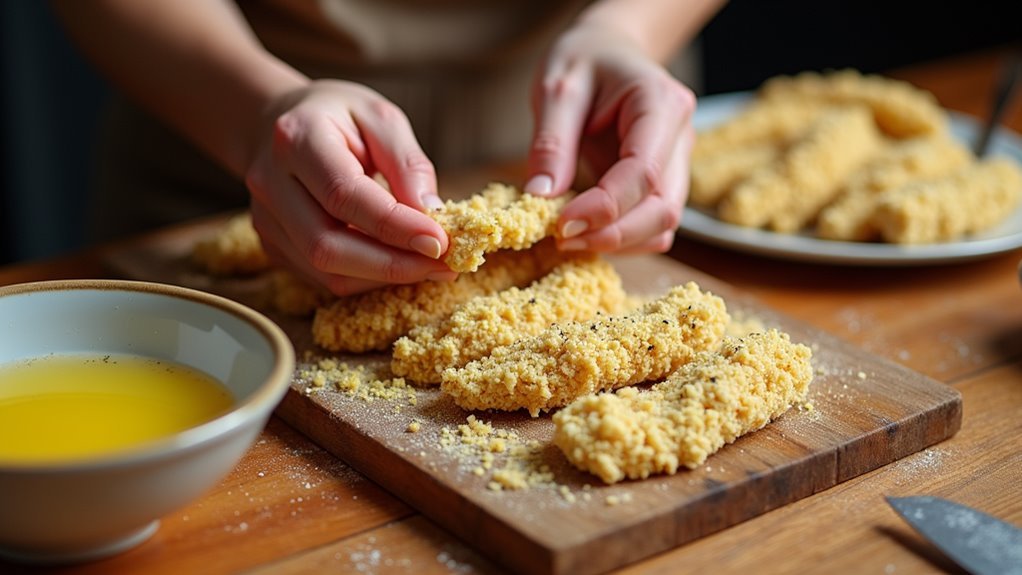
With your seasoned breadcrumbs ready, it's time to coat the chicken pieces. This step is where the magic happens, transforming simple chicken strips into irresistible chicken fingers.
Dip each piece into the beaten eggs, ensuring they're completely covered. This helps the breadcrumbs adhere better, creating that delightful crunch.
Next, roll the chicken in the seasoned breadcrumbs, pressing gently to make sure each piece is thoroughly coated. Don't rush—take your time to cover every inch with the flavorful crumbs. This is what gives your chicken fingers their signature crispy texture.
As you work, you'll see them transform into a golden promise of deliciousness. Get ready to impress everyone with homemade chicken fingers that are bound to become a family favorite!
Step 5. Fry Chicken Until Golden
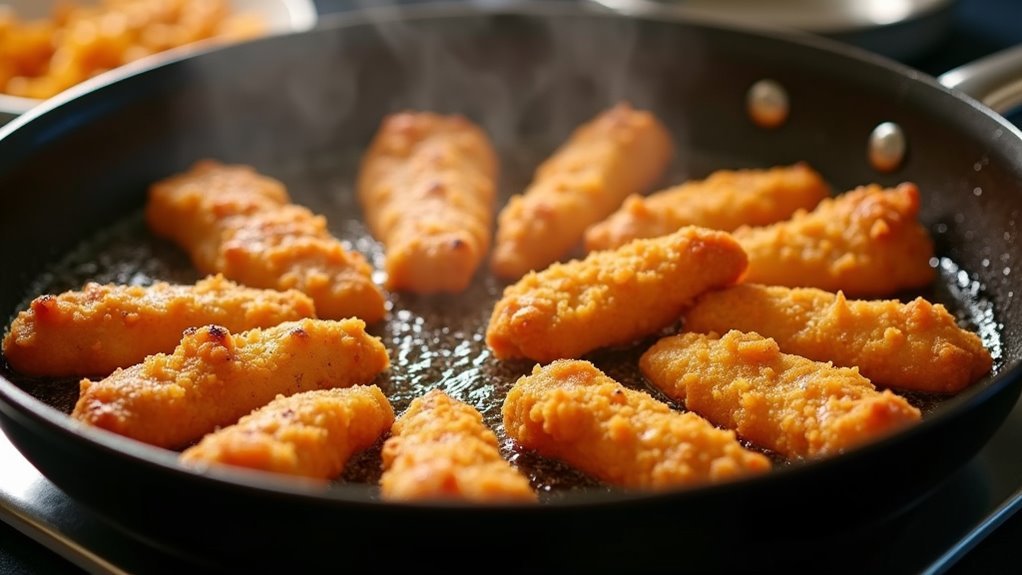
After coating your chicken pieces in the seasoned breadcrumbs, it's time to bring them to life with a golden fry.
Heat a generous amount of oil in a large skillet over medium heat. You'll know it's ready when a breadcrumb dropped in sizzles.
Carefully place the chicken fingers into the hot oil, ensuring they've enough space to cook evenly. Let them sizzle and turn golden, about 4-5 minutes per side.
The moment they achieve that perfect golden hue, you can almost taste the crispy goodness.
Flip them gently with tongs or a spatula to prevent splattering. Once cooked through, remove them and let them rest on paper towels.
This brief rest keeps them crispy, inviting everyone to dig in and enjoy!
Final Thoughts
Having mastered this quick chicken fingers recipe, you'll find it becomes a go-to meal in your culinary repertoire.
These crispy, tender delights aren't just a hit with the kids—they're a crowd-pleaser for all ages. With just five simple ingredients, you can whip up a delicious meal in no time.
The secret is in properly seasoning the breadcrumbs and maintaining an even cooking temperature, ensuring each bite is perfectly golden and juicy.
Don't forget to let them rest on paper towels for that extra crispy finish.
As you perfect this dish, you'll gain confidence to experiment with different spices and dipping sauces, making each meal uniquely yours.
Enjoy the satisfaction of creating a homemade favorite that's sure to impress!
Frequently Asked Questions
Can I Use Panko Instead of Plain Breadcrumbs?
Absolutely, you can use panko instead of plain breadcrumbs!
Panko gives your chicken fingers an extra crispy texture that's simply irresistible. Just follow the same steps—dip your chicken in beaten eggs, then coat with panko mixed with salt and pepper.
The result is a delightful crunch that'll have everyone coming back for more. Make sure to monitor the oil temperature, and you'll achieve perfectly golden, crispy chicken fingers every time!
Enjoy cooking!
What Dipping Sauces Pair Well With Chicken Fingers?
Imagine the perfect sidekick to your crispy chicken fingers: a dipping sauce that elevates every bite.
Go beyond ketchup! Try honey mustard for a sweet and tangy twist, or ranch dressing for a creamy, herby delight.
Barbecue sauce adds a smoky depth, while buffalo sauce offers a spicy kick.
Mix some sriracha with mayo for a zesty blend.
These sauces will make your chicken fingers an irresistible, flavorful adventure!
How Can I Make the Chicken Fingers Gluten-Free?
To make your chicken fingers gluten-free, swap out the breadcrumbs for gluten-free alternatives like crushed rice cereal or gluten-free panko.
You'll still get that crispy, delightful texture everyone loves! Make sure to check your seasonings and oil for any hidden gluten.
It's simple, exciting, and delicious! You'll enjoy making this quick adjustment and serving a dish that's perfect for everyone, without sacrificing flavor or crunch.
Give it a try today!
Can These Be Baked Instead of Fried?
Absolutely, you can bake them!
Preheat your oven to 400°F, line a baking sheet with parchment paper, and place the breaded chicken fingers on it.
Lightly spray them with cooking oil for a crisp finish. Bake for 20-25 minutes, flipping halfway through, until golden brown and cooked through.
This method keeps them deliciously crispy without the extra oil, making them a healthier, yet still flavorful, alternative.
Enjoy the joy of homemade goodness!
How Do I Store Leftovers for Later?
Storing your delicious chicken fingers for later is a breeze!
First, let them cool completely to keep that irresistible crispiness.
Place them in an airtight container or wrap them tightly in aluminum foil.
Pop them in the fridge if you plan to enjoy them within a couple of days.
For longer storage, freeze them.
Just reheat in the oven at 350°F until they're hot and crispy again.
Enjoy your tasty leftovers anytime!